Posts

Explosion boxes

Image
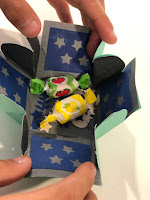
Box example Explosion Boxes If you love pop-ups – those playful, joyful constructions that bring books and cards to life –  then you will enjoy making “ explosion boxes .” These popular 3D paper crafts take pop-ups to a  whole new world. Like pop-ups, “explosion boxes” offer an engaging way to invite students into the world of  math and engineering. They encourage students to explore and work with measurement, parallel  and perpendicular lines, angles, triangles, symmetry, and transformational geometry, all in the  context of engaging students to design and make themselves. Although the deepest learning comes when students design from scratch,  The simple explosion box shown here is designed to enclose a small Valentine’s Day treat, gift, or note.  It can be printed first and then cut, or cut without printing from coloured card stock or plain white paper  that students decorate themselves. Box Example Add caption Students can custo

Rock Candy

Image
Aim: To understand the formation of crystallisation Materials 4 Wooden skewers (cut in half) 1 cups of water 2 cups of sugar ( more or less depending on the environment) 2 clothes pegs 2 glass jars/drinking glasses Method Pour 1 cup of water and 1 cup of sugar.  Put it all into a large saucepan, because once you put it on the stove it will expand while boiling.  Mix up the first bit of sugar before putting it on the stove.  Once your pot is on the stove, w atch the sugar dissolve and  bring it to a low boil over medium heat, and continue to add sugar one cup at a time until you can no longer dissolve any more of it (making a completely saturated sugar solution). Turn off the heat and allow it to cool for 15 minutes. While your sugar is cooling you can prep your sticks.  Soak them in water and roll them in a coating of sugar to give the new sugar crystals something to “seed” to.  Be sure to let them dry all the way! If they are still too w

Fireworks in a Jar

Aim Materials • Clear Jar (glass or plastic) • Oil • Water • Several drops of food coloring • Plastic Fork Method 1. Fill your jar ¾ full with warm water. 2. In a separate bowl, mix a few tablespoons of oil and several drops of different colours of food colouring. 3. Use your fork to gently mix the oil and food colouring together. 4. Gently pour the oil mixture into the jar. 5. Watch what happens—the food colouring will slowly sink out of the oil and into the water. When this happens, it will expand and begin to mix with the other colours. Conclusion Food colouring dissolves in water but not in oil. The oil is less dense than the water, it will float at the top. The coloured droplets will begin to sink because of their density.

Dancing Spaghetti

Image
Materials Large beaker 150ml graduated cylinder 50ml cups of vinegar 2 tsp baking soda 50ml water  8-10 sticks of broken spaghetti. Food colouring  Procedure Fill the beaker with water  Measure and pour 100 ml of vinegar into the beaker. add the food colouring - if needed Add two tablespoons of baking soda to the water and mix thoroughly. Put eight to ten pieces of broken spaghetti in the beaker and wait until the spaghetti settles to the bottom. A chemical reaction will take place, causing the spaghetti to move in the beaker.  Repeat experiment with different ratios of water, vinegar, and baking soda. Whats happening The noodles will bob up and down for several minutes. This noodle “dance” is captivating to watch. Since the surface of the noodles is rough, tiny bubbles of carbon dioxide gas are attracted to it. These bubbles increase the volume of the noodle substantially, but contribute very little to its mass. As a result, the overall density of

JACK O’ LANTERN SLIME

Perfect  Halloween play with Jack O Lantern slime ! THE SCIENCE BEHIND THE HOMEMADE JACK O LANTERN SLIME RECIPE What’s the science behind the slime? The borate ions in the slime activator {sodium borate, borax powder, or boric acid} mixes with the PVA {polyvinyl-acetate} glue and forms this cool stretchy substance. This is called cross linking! The glue is a polymer and is made up of long, repeating, and identical strands or molecules. These molecules with flow past one another keeping the glue in a liquid state. Materials Clear Glue ( from any hobby shop) Liquid Starch   {or borax } Water 1/2 cup measure, spoons, and 2 containers for mixing Jack O’ Lantern table scatter {or what ever you find!} Procedure   In one bowl   mix 1/2 cup water and 1/2 cup of glue  {really mix to combine completely}. Pour glue into water. Stir the glue and water together well! Now’s the time to add colour, glitter, or confetti! Remember when you add colour to white glue, the colo

ICY CHRISTMAS TREE

Image
How many ways can you engineer a Christmas tree! This  icy Christmas tree STEM project  was super fun. We had a great time piecing together this icy Christmas tree before it melted.  Materials Different size containers  Water Food colouring Tinsel {optional} Procedure Freeze water in each of the containers.  Mix in green food colouring and add tinsel for a  more festive look. You can also dump in glitter and other Christmas themed objects for melting out later!  Next, prepare a surface for the icy tree parts. Use a large cookie sheet and put some parchment paper down. A sturdy piece of cardboard could also work. You may want to transfer to a bin after if you want to melt the ice with warm water. When frozen, remove the ice blocks and get started. You can put on gloves if you want to. Try squirting a bit of warm water will help set them in place better. This can be tricky, so you have to work on creating a stable base and use your building skills to get your tree

Doodle for Google

Image
This year for hour of code, I got my students to do the Doodle for Google coding in scratch. They thoroughly enjoyed they programming and learnt new concepts of how coding works. Have a go yourself. Follow this link: Doodle for Google in Scratch